Here is my guide to CAREFULLY and effectively stripping paint from wood trim/paneling using chemicals…eco-unfriendly noxious chemicals…chemicals with dangers on-par with the dangers of the lead paint you are probably removing. Okay, perhaps I cannot qualify that, but it is none-the-less bad stuff, those chemicals. This is what I shall discuss here.
-1- Protect Yourself
-2- Protect Your Walls & Floor, etc.
-3- Protect Your Wood
-4- Take It Off, Take It All Off
       paint bulk
       residue
       stain/varnish
       et al
If you are not reading this because you are about to do some stripping on your own, I suggest you merely peruse the not-so-pretty pictures and move along. I suspect even my *shiny* prose will succumb to the #messy# nature of stripping paint. But if you, dear reader, still chose to stay with me, then let us begin. Or rather, let’s talk about beginning to begin.
PROTECT YOURSELF First, PROTECT YOURSELF. That bears saying again….PROTECT YOURSELF….The best way to protect yourself is to hire someone else to do it, but then you may be foregoing #2 & 3, as I had experienced (see HorrorShow!).
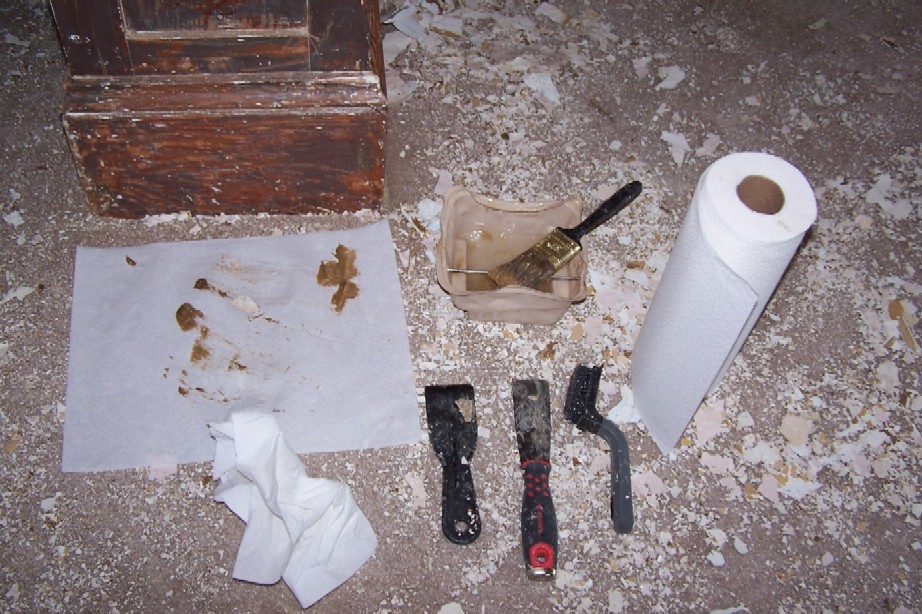
Stuff You Will Need:
A. Trash-worthy long sleeved clothes & shoes (tape any holes over)
B. Half-face Chemical-Grade Respirator suitable for stripping
C. Goggles (protection against splattering)
D. Gloves (neoprene or 2-layers of latex…buy a box)
E. Ventilation (think “open windows” and perhaps a fan)
Methylene Chloride is usually the effective agent in this class of strippers. A general rule of thumb is that the effectiveness of the stripper is proportional to the pungency of the vapors. If it smells like lemons or potpourri then you might just be stripping grime rather than paint; It should make you back away flailing your arms for fresher air. And always read the warning labels and “In Case of Emergency” bits just cuz.
Make sure your respirator seals around your face (a beard will prevent this so I would then recommend either shaving or investing in a full-face mask). Test the seal by covering the filters with the palms of your hands and suck in. Reseat if needed, or try washing your face.
As for gloves, I use latex because they are cheap and plentiful. I use 2-layers for 2-reasons. Firstly, because the stripper burns on contact, two layers delay the burn long enough to give one time to wipe it off beforehand. The other reason is that eventually the top layer will tear or begin to melt through and it’s good to have another layer underneath protecting your skin. If/when it gets onto your skin, immediately wipe it off and wash it with cold water.
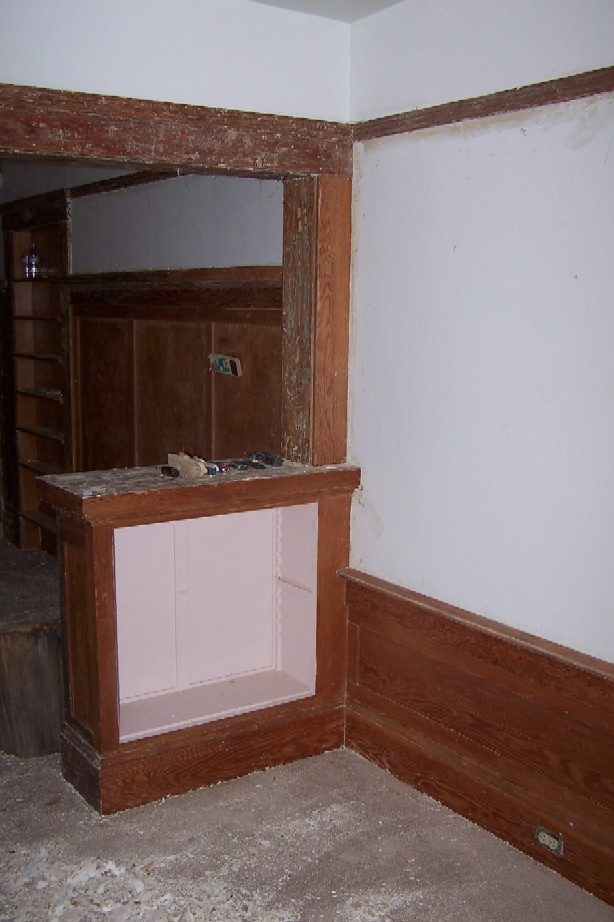
PROTECT YOUR WALLS & FLOOR, ETC. Our second stage is also known as prepwork. Mask off walls and other surfaces from the areas you will strip with masking tape (& paper). Also lay down and tape a relatively non-permeable paper or tarp over your floor. Butcher paper works but so do a number of other disposable covers. Because we will dispose the tobacco-scented carpet, it will double as our tarp. Remove outlet/switch covers, thermostats, doors, drawers and anything else you can, even if you mean to strip these, too (my former workers neglected to do even this…lazy); it’s much easier to strip these things separately and outside. Ideally you would remove all your wood trim and do this outside, but that takes much more time/effort and adds further risk to damaging your precious wood (though some people DO do this).
PROTECT YOUR WOOD
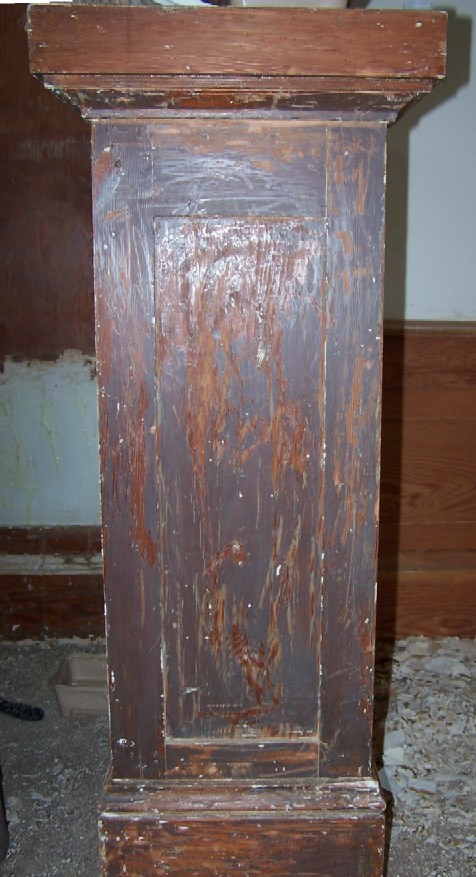
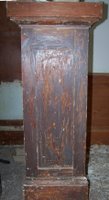
 This is really just to remind you to be patient. It’s so hard to do this sometimes because it takes a really long time to strip properly and sometimes you just have to see some progress, so remember that it’s remarkably easy to damage your wood permanently and difficult/near-impossible to fix/replace. Focus on the four phases and their goals mentioned below, and do not try to more than that. I mean to say that while you are Scraping the Bulk of The Paint Off, do not become overly concerned with getting it all down to the bare wood; if it comes off, it comes off, but if it doesn't, leave it and get it on the next phase(technique). Do not become careless, as evidenced in the picture above by my ex-workers. Should you have a Victorian-era home with lots of curvy trim, well, you have my pity. Curved surfaces are excruciatingly time-consuming and difficult too, and hand-carved elements…well, I am sooo sorry if you have any carved elements that need stripping. In the later case, think toothbrush and dental pick, tabletop and Gregorian chants. >whack<
TAKE IT OFF, TAKE IT ALL OFF
And so it begins. These are the tools I recommend by order of sequencing:
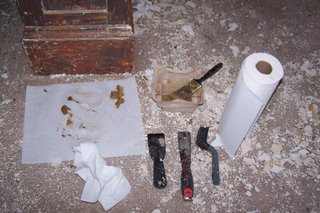
A. glass or metal receptacle (not plastic as you see here; see why?)
B. plenty o’ cheap paintbrushes (you will not be re-using them)
C. plastic scrapers (this is your friend)
D. stiff metal scraper/putty knife (this may be your enemy)
E. stiff nylon brushes (another friend)
F. maybe a small brass brush (another enemy)
G. large supply of paper towels
H. metal trash can
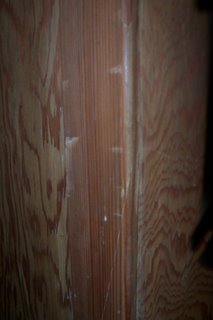
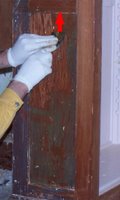
 Stripping 5-7 layers of paint is done in about 5-7 passes, no matter what the product claims I’m sorry to say. This first pass (or four) will be to get the bulk of the paint off, wherein you see as much wood as you see paint residue, much like you see here. Note that there is still much paint present, not to mention the stain/varnish. This early part of stripping takes little force.
Phase 1 –Paint Bulk: (damage risk: 1 of 5)
what you need to know
- Focus on a contiguous surface (single facet) like a long trim piece or panel portion
- worry about edges/transitions on a separate pass
- only 2-5 square feet at a time (I work on 2-3 separate areas each in different phases)
- work on higher pieces first
- get on as much stripper as will stay on the surface without it dripping off
- wait the recommended time (5-20 minutes typically but no longer)
- scoop softened/curled paint w/ plastic scraper relatively gently
- wipe into can
- repeat until you reach the goal of 50/50 wood-to-paint visually
- this will take more than one pass
Phase 2 – Paint Residue: (damage risk: 2)
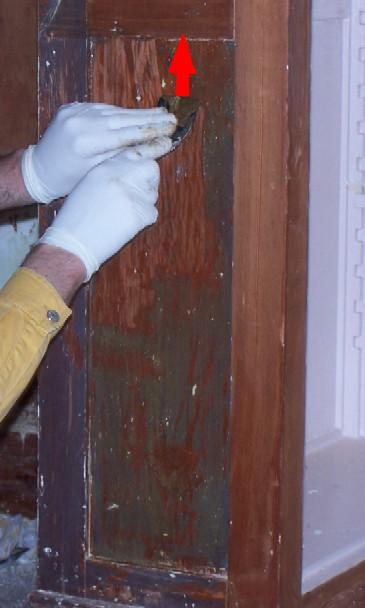
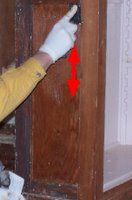
 This is relatively similar to the previous phase, with the difference being sludge. After another thick coat of stripper, instead of peeling paint rolling off like curtains, you will be scooping a goopy mess of discolored sludge as the remaining paint residue melts and mixes with the stripper medium. Use both hands and push the sharp edge of the plastic scraper hard through the slop with the grain of the wood. It is more likely you would mar the plastic before you damage the wood, unless there are already spawls/splinters in the wood to catch. Just be mindful as you are doing this and you’ll be fine (If you do this with the metal scraper you WILL do damage. This is why my trim/walls were damaged. See photo near top of this post). Instead of just dumping the sludge into the can, wipe the plastic scraper clean on a paper towel before taking another scoop off. If you don’t wipe it clean each time you will just smear the melted paint goo across your wood. One paper towel square will be good for 1 square foot of stripping. Continue this until you accheive the goal: you should see primarily wood with very little visible paint remaining. This may take more than one pass. When complete, lay down another thick layer of stripper and wait.
Phase 3 – Stain/Varnish Layer: (damage risk: 2½)
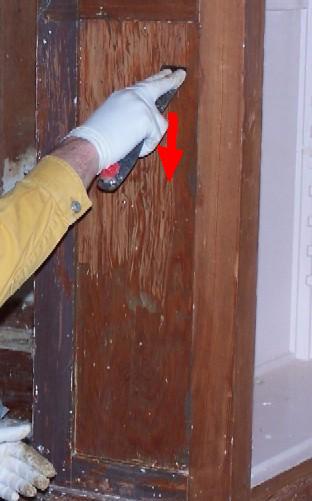
 You can get quite a bit of the original stain/finish off, thereby reducing the amount of sanding needed. The damage risk is low if you go slow. Pull the metal scraper with enough force with the grain. Don't pull so hard that you see wood pulp peel up. By now you will have done 3-5 coats of stripper and the wood will begin to soften on the surface. The force you exert on the blade now will squeeze some of the stains out of the wood similar to a squeegee to a sponge (wood is not entirely dissimilar to a sponge). The sludge you extract should be very discolored, only less so than previously. Always have control over the blade and do not let it “get away from you”. Your goal is to remove most/all shiny spots due to varnish. This often takes more than one pass. When complete, lay down another thick layer of stripper and forego the waiting this time.
Phase 4 – Bits and Bobs: (damage risk: 1-3)
 Any dings and dents in the wood prior to stripping will still have paint in them, as would any cracks or old nail holes. This is when you use the nylon bristle brush. It is soft enough for the already softened wood. The stripper will also draw out more stain as you scrub-a-dub and agitate the wood. You may need to use a small brass brush to get deeply imbedded or stubborn spots, but be careful as the brass will leave a tarnish on the wood if you scrub too much/hard (stainless steel bristles may scratch the wood so use with extreme caution).
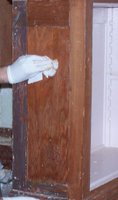 Then promptly remove the excess sludge by the method outlined previously with the metal scraper. Also continuously wipe the surface with a clean spot of paper towel. Many paper-towel-bearing trees will be sacrificed through this process, but when complete, you should have a pretty clean surface, excepting a few dental pick worthy spots. Your goal here is to have a realitive nude surface. You can tell you've done enough when the gunk you scrape and wipe off is only moderately discolored. This usually takes more than one pass. Now you should be ready for sanding.

One final note: Please dispose of your old and probabally leaded paint, stripper residue and myriads of toxified paper towels properly/responsibly. Contact your local Hazardous Waste facility or City to find out where to take it. You don't want this stuff leaching into your water.
Labels: chemical primer, how-to, paint stripping
 That said, I shall show you yet another expensive misdeed from contractor laziness/carelessness. This particular instance is from a PO's hire. The window you see is neither clouded by glare nor paint overspray, nor overzealous sneeze. The window has been pitted by sandblast. When this house was painted some time ago, a contractor chose to sandblast the exterior window frames/trim prior to repainting, rather than stripping them by hand. It appears that they didn't subscribe to the "95% preparation, 5% decoration" rule, thereby not bothering to mask the windows well beforehand. Besides,
 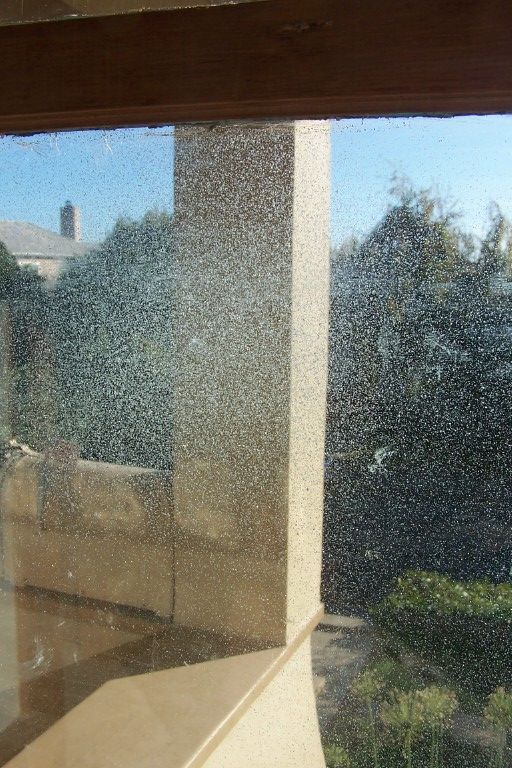 cutting time in half for painting, sandblasting does a good job at cutting the wood down, too. You sandblast engine blocks and steel ships, not wood windows! The exterior trim now has softened edges and I have counted some 13 panes of glass sofar that have sandblast damage, the one shown here being the largest (8'-0" x 3'-0"). This will be the most costly to replace, as I will have to HIRE SOMEONE TO DO IT FOR ME!!!